How to Setup SUSE 15 SP1 for SAP

Installing SUSE 15 SP1 for SAP in a VM
This is third in the series that will end with a proper install of SAP B1 10 on SAP HANA 2.0. The first article was on how to setup a new dedicated Hetzner Server as a base. The second article was on how to install Proxmox on Hetzner server
In this article we will see how to install SUSE 15 SP1 on VM that would then be used a a base to install both SAP B1 version 10 and SAP HANA version 2.0.
VM requirements
SAP HANA is a high-performance in-memory database that speeds data-driven, real-time decisions and actions. As such it has quite heavy system requirements. For the purposes of this article we are using the VM with following specs:
| Device | Specs |
|---|---|
| RAM | 128GB |
| HDD | 1TB |
| CPU Cores | 10 |
VM Creation process
- Create a new VM in Proxmox

- Under General, give a proper name to the VM so that it is easier to locate if you end up having many VMs on the server

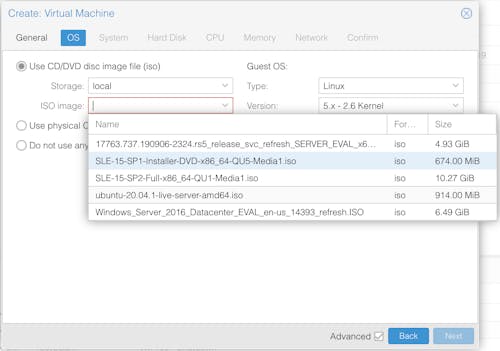
- Under OS, choose the right ISO, in this case SLE-15-SP1, for installing
- Under System, all the default settings are fine

- Under Hard Drive, make sure to assign at least 900GB space to the VM, in this case we are assigning 1000GB

- Under CPU, we are assigning 10 CPU cores and most importantly, under CPU Type, we need to set it to
Host. This will allow VM to use all the available CPU extensions on the Host CPU. This is required, otherwise you will not be able to install SAP HANA on the VM.

- Under Memory, assign 128GB RAM and 64GB as minimum RAM.

- Under Network, no changes required, all default values are fine.

After a minute or so you’ll find that your new VM has been created, and you can see it under Datacenter -> proxmox -> 100 (saphana2). Right click on 100 (saphana2) and choose Start, then Right click on 100 (saphana2) again and choose Console to see the UI, from where you will install SUSE.
SUSE Install Process
- Start Install Process by choosing Installation from the boot menu

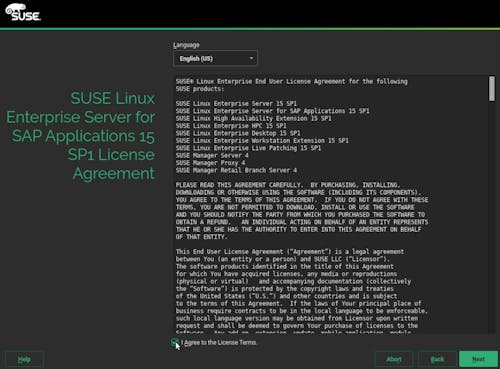
- Make sure to select SUSE Linux Enterprise Server for SAP Applications 15 SP1

- Accept the License Terms
- You will now be shown the network settings. This is very important screen because if the network is not setup properly then the install of
SUSEandSAP softwarewill not proceed. Follow the next few steps to setup the Network properly (in case you are using Hetzner Bare metal server as described in Article 1 and 2). If you are using some other cloud or bare metal provider then hopefully your network will already be setup properly to use DHCP, so you might not need to make changes mentioned here.
The screen below shows the default network setting before you make any changes.
- Press Next to start the network config process.

In the Network Card Setup, in the Address tab, ensure that:
- Configuration Name is
eth0 Statically Assigned IP Addressis selected- IP: enter one of the free IP address from the additional IP subnet assigned to you, in this case
100.100.100.33 - Subnet Mask: Make sure its set to
255.255.255.255 - Hostname: Full FQDN to be assigned as hostname (
saphana.example.comshown here). Without this SAP will not get installed
- Configuration Name is
Press Next to save the above.

Make sure that the settings that you entered are reflected in the Network Settings screen that is shown.
- Important: Make sure to press
Hostname/DNStab and not the Next button

In this tab, make sure to enter the following:
- Hostname, enter the first part of the FQDN you entered in last screen, here
saphana2is shown but it should have beensaphana - Make sure
Set Hostname via DHCPis set tono - Enter
Name Server 1 & 2, it is recommended to use Google DNS (8.8.8.8, 8.8.4.4) but you can also use some other setting like Hetzner DNS, (213.133.98.98, 213.133.99.99, 213.133.100.100)
- Hostname, enter the first part of the FQDN you entered in last screen, here

Important: Make sure to press
Routingtab and not the Next buttonRouting Settings
- First set the
Default IPv4 Gatewayto your main IP address, which in this case is11.11.11.11 Device: Make sure its set toeth0- Ensure
Enable IPv4 Forwardingis checked
- First set the
Click the Add button and then in the routing table popup add your main IP address i.e. 11.11.11.11 as the Destination while making sure eth0 is selected in the Device
- After adding the entry into the Routing Table, press
Next

At this point you will have to enter the Registration Code and its related Email Id of your SUSE License. In case you do not have the license, you can create an Account on SUSE site and then request a trial code from SUSE, from this link, that you can use on this screen.

- Choose
Yesto continue

- The next screen is very important as here you need to choose all the software that will be required for proper SAP Install. Make sure to select the following:
- SUSE Linux Enterprise High Availability Extension
- SUSE Package Hub
- Basesystem Module
- Desktop Applications Module
- Development Tools Module
- Legacy Module
- Python 2 Module
- SAP Applications Module
- Server Applications Module
- Web and Systems Module
- Select
Nextto continue

- The install process will contact SUSE server and register the install

- Make sure to select
Trustto get the PnuPG key to procees

- No need to select anything on this screen, just press
Nextto continue

- Make sure that
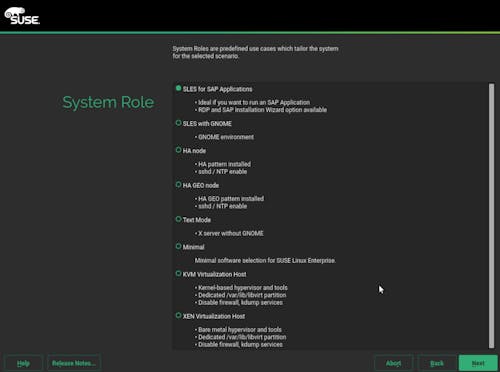
SLES for SAP Applicationsis selected and then pressNext
- Here unselect the
Launch SAP product installation wizard...as we will be installing SAP using the install files we have manually downloaded from SAP site. In case you have SAP install media then you can check this option

- Partitioning is another critical part of the install process. This is what you will see as the default or suggested partitioning. SAP recommends that following partitions be created for SAP to work properly.
| Mount Point | Partition Usage | Recommended Partition Size | Our Partition Size |
|---|---|---|---|
/hana/shared | SAP Installation Path | 1 x System RAM | 128GB |
/hana/data | SAP Data Volume | 3 x System RAM | 384GB |
/hana/log | SAP Log Volume | 1 x System RAM | 128GB |
/usr/sap | SAP System Instance | minimum 50 GB | Remaining space |
- Select
Expert Partitioner -> Start with Current Proposal

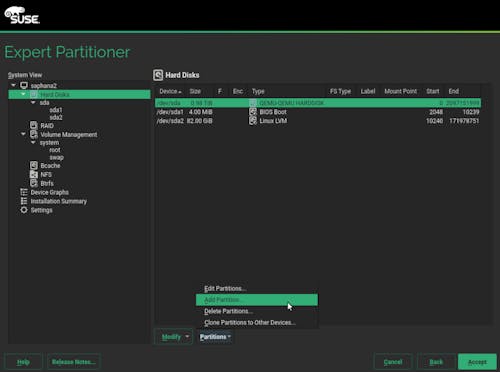
- You will need to create 4 partitions based on the SAP recommendations. To create the partition, click on the
Hard Disksand then selectPartitions -> Add Partition
- Choose Custom Size and the enter the required Partition Size,
128GiBin this case

- Make sure to choose
Data and ISV Applications

- Add the mount location of the Partition under
Mount Point, which in this case is/hana/shared

Do this for process of adding Partitions for all the partitions required by SAP as mentioned above.
For
/usr/sap, you can just allocate whatever HDD space is left, in this case277.99GiB

- Confirm that all the Partitions are defined as required by SAP and then press
Next

- Choose the Timezone by clicking the map and then press
Next

- Make sure to give a secure password for the
rootuser and pressNext

- Enable
sshunderSecurityas it will be disabled by default
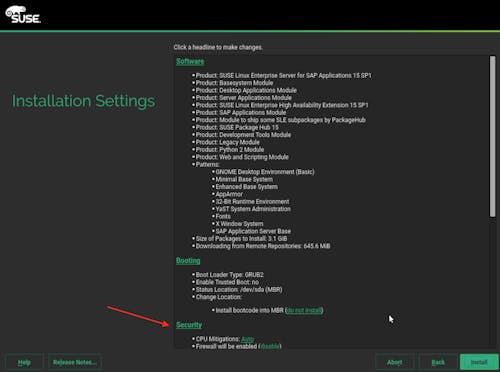
- Verify all the setting are correct before pressing
Nextto start the install process

- It will take about 5-10 minutes to install SUSE, depending on your server speed. After the install you will be able to log in to the server and start the SAP install proces
- Indivar Software Solutions Pvt Limited, India and New Zealand: Co-Founder and CTO
- Credence Medicure Corporation: Co-Founder & Director - IT
- Stakteck Limited: Co-Founder and CTO


